Do you want to train your instructors/teachers in using Tivilo or refresh your own memory on how to use the Tivilo system? On this page, you can find our introduction on how to use the Tivilo system.
The introduction consists of a series of short clips demonstrating how the basic functions on the instructor unit are used, allowing instructors to get started with teaching via Tivilo. It takes approximately 10 minutes to go through. Our customers can also access this introduction on their instructor units by clicking on the book icon in the upper right corner of the instructor units.
The page is divided into three sections, where the first section is a brief introduction to the equipment used in the Tivilo system, the second section covers all the features utilized by all our customers, and the third section deals with the functions related to exercise display for customers using our exercise module.
Equipment in the Tivilo system
The vehicle units
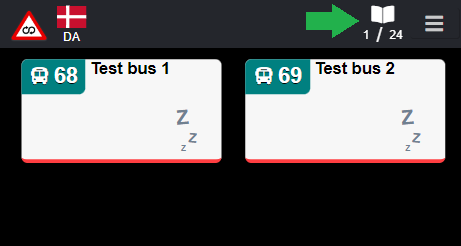
The vehicle unit is a smartphone or tablet which is mounted in selected vehicles at the facility. The responsibility of this unit is to collect information about the vehicle and the driving performance of the student and send them to the instructor unit which you are in possesion of right now.
The vehicle unit also makes it possible to show the students certain informations directly in the vehicles, such as instructional illustrations or speed measurements.
The instructor unit
The instructor unit is the device the instructor uses to monitor their vehicles and teach via Tivilo.
The instructor unit is a phone, usually equipped with a cover and a red keychain with the Tivilo logo, making it easy to recognize the device.
In this introduction, you will receive an overview of how you, as an instructor, use the instructor unit in your teaching.
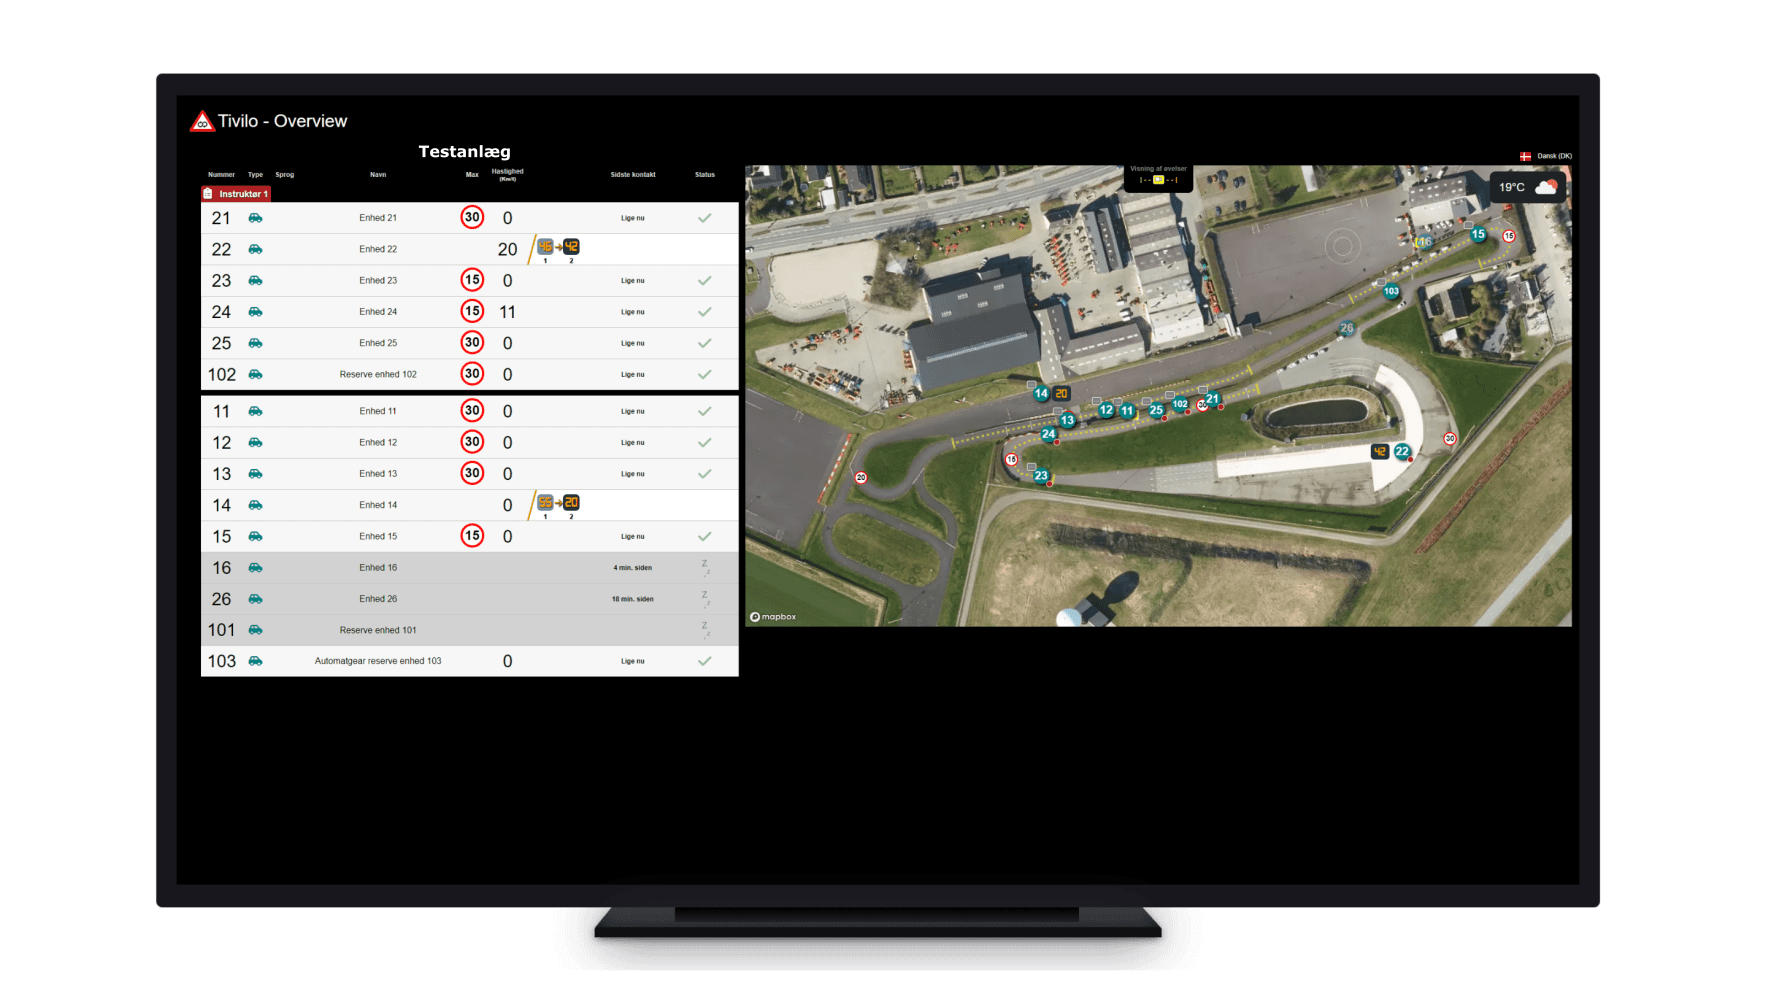
The big screen solution
Tivilo has a socalled big-screen solution which is present at you facility. The purpose of the big-screen solution is to give you a bird’s eye view of the whole facility with live locations of the vehicles with Tivilo installed at the facility.
On the screen you will also be able to find a lot of other useful information which will be covered later in this introduction.
General functions
Choose a course
If your Tivilo solution supports multiple courses then start by choosing the course you are going to teach by pressing the big teal colored button at the top of the screen. After that you will be able to choose a course from a list.
The list of available vehicles is automatically updated to show you the vehicles you can use with the selected course.
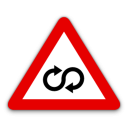
Choose your vehicles
Choose the vehicles that you want to use for teaching with your students by selecting the grey boxes. The number in the left corner of the box is the vehicles number. If you press the same box again the vehicle is deselected from the set again.
Press the checkmark at the bottom to the left to complete your selection.
Popup messages
After you have selected you set of vehicles Tivilo has the ability to show you a number of popup messages which informs you about different issues with your select vehicles that has to be addressed before the system works correctly.
The messages contains a description of which vehicles that has issues and tells you how you solve them with accompanying text and video illustrations.
If you have more than one popup message you can scroll through the messages by using the arrows at the bottom of the message.
See messages again
If you wish to see the latest popup messages again you can press the button with the bell icon down in the right corner.
The botton has a small indicator which shows you how many messages you have in total. If no messages are present then the indicator will be hidden and the button will be disabled.
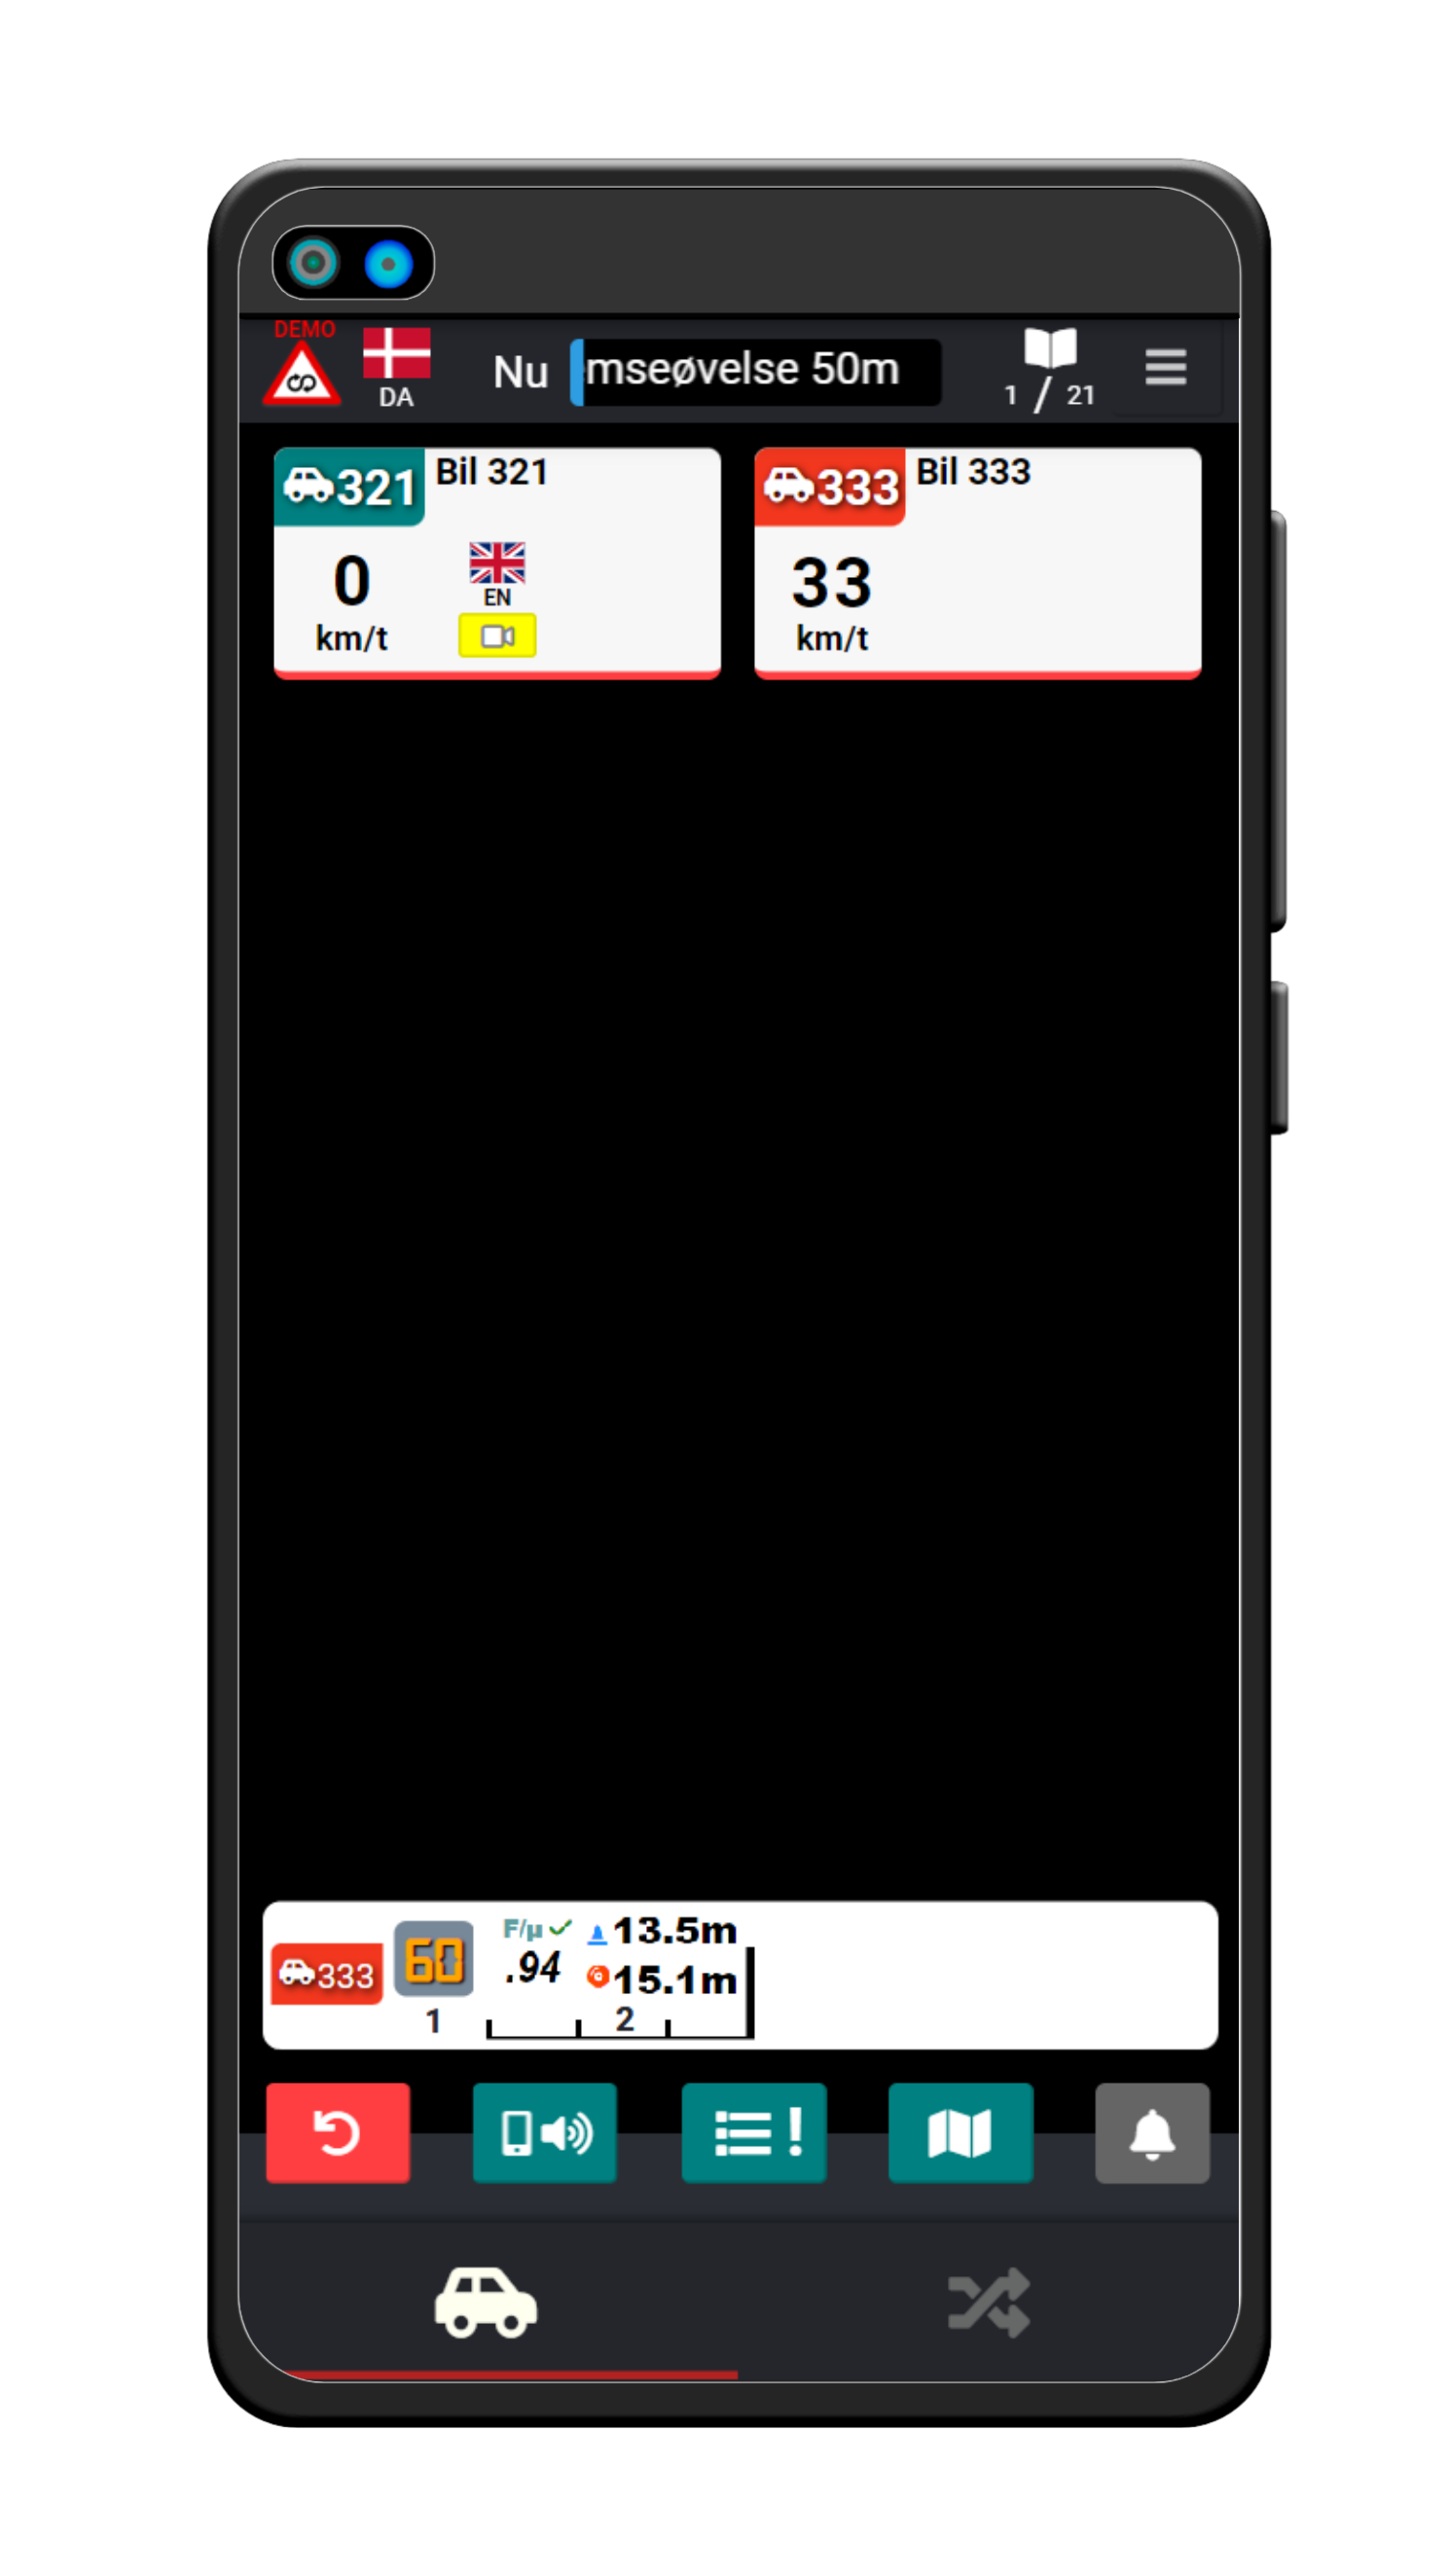
Informations on the vehicle overview
When you have selected a set of vehicles you can receive live information about the vehicles.
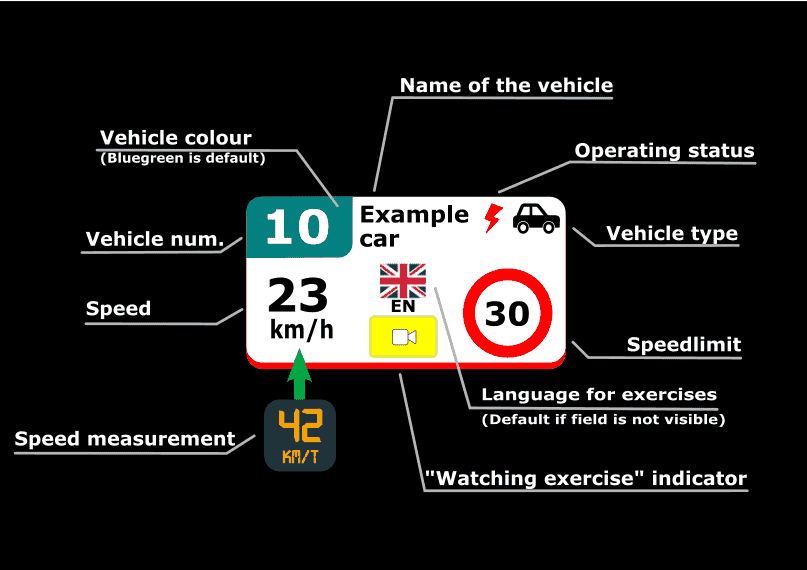
In the illustration above you can get a quick overview of all the informations you have available to you via the vehicle boxes.
Detailed vehicle information
You can also press each box after you have selected your set of vehicles to open a big window with detailed information about a single vehicle.
The most important informations found in this window for you to know will be introduced on the following pages.
Speeding
You may experience that your unit will begin to vibrate and play an alarm sound and also show a small exclamation mark which will begin to blink red next to the current speed for a vehicle. This is an indicatation that one of your students are speeding right now.
If the student continues to drive too fast then a notification will be sent to the instructor unit where you will be able to see it in the detailed information window for each vehicle.
Notifications overview
In the menu for the vehicle overview you will find a button with a vibrating phone.
By pressing this, you will find an overview of the notifications you can receive and possibly the option to change settings.
You may have seen this overview, as Tivilo can be set to show the overview when a new party is set.
Which notifications are available depends on the configuration of the system and may vary from facility to facility.
Events for the party
In the menu for the vehicle overview you can also find a button with a list icon.
By pressing this, you will find an overview of all the events for your party.
Under the event overview, you can find checkboxes that you can use to filter the events. You can filter by type and limit the view to only show events on your party.
You can scroll down in the overview to see events further back in time.
The satellite map
In the menu under the vehicle overview you will also find a button with a map symbol.
By pressing this you can see a map of the facility with the location of the vehicles in your party.
This is useful if you don’t have a clear view of your vehicles and want to quickly know where the vehicles are right now.
You can zoom in and out on the map as needed and you can press a reset button in the top right corner if you want to reset the view.
Reset your set of vehicles
Reset your set of vehicles by navigating back to the vehicle overview and press the red button with the circular arrow to the left at the bottom of the screen.
You have now reset your set of vehicles and can choose to pick a new set of vehicles or put the instructor unit back in place after your teaching session has ended.
Functions for displaying exercises
NOTE: Tivilo offers two different product types, namely our full package with exercise display and our monitoring package, which does not include exercise display. If you are unsure which solution your facility uses, please contact your superuser for more information about whether your facility uses exercise display before reading the rest of the introduction.
Navigate to the exercise overview
When you have selected your set of vehicles and are ready to start your teaching session you can navigate over to the exercise overview to initiate exercises for your set of vehicles.
To do this, tap the two braided arrows at the bottom of the screen on the right.
Check your selected course and vehicles
You can get an overview of your set of vehicles at the top of the screen on the exercise overview. Check the overview to see if you have the correct course and vehicles selected.
If you have not selected a set of vehicles yet or have selected the wrong vehicles then press the button with the car icon at the bottom of the screen to the left to navigate back to the vehicle overview to reselect your set of vehicles.
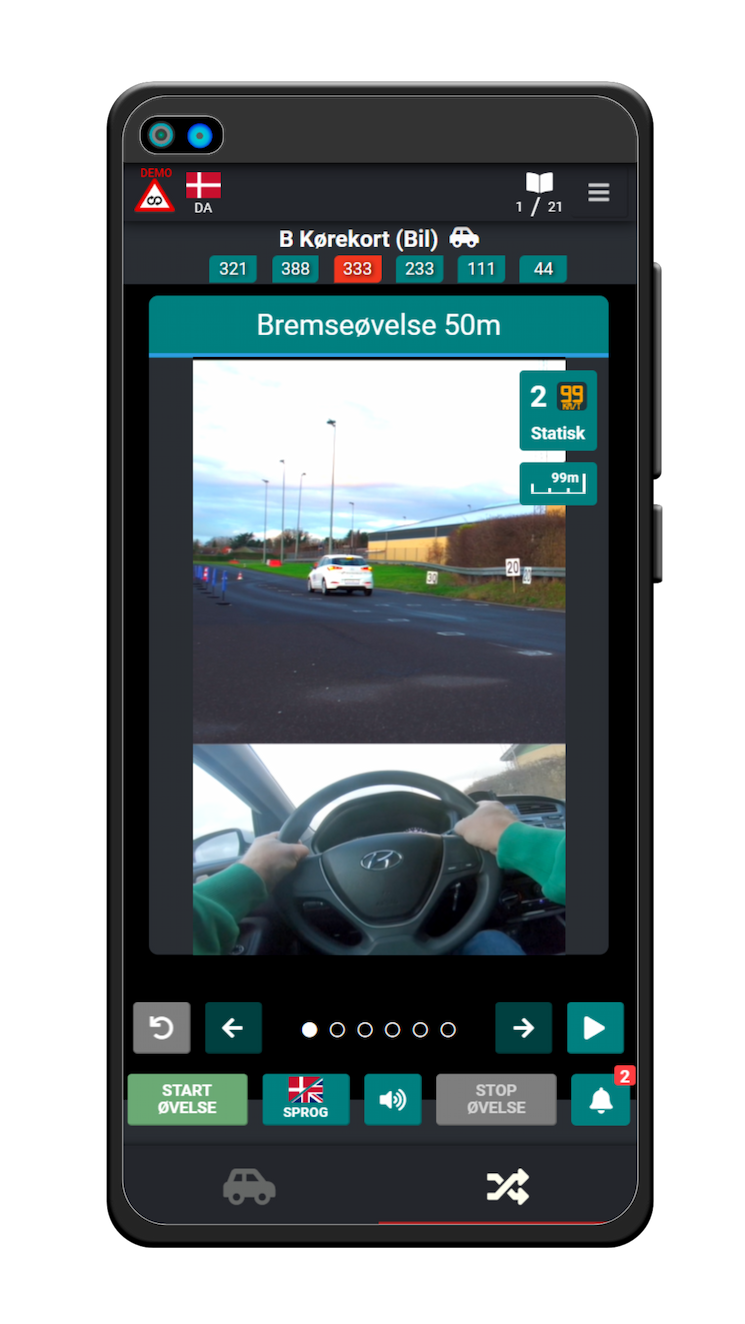
The exercise gallery
In the middle of the screen on the exercise overview you can see a gallery with the exercises which your selected course contains which can be displayed to your students.
To scroll to another exercise in the course, you can tap the teal colored arrows to the right and left below the gallery.
Oral explanation of exercises
Along with the exercise illustration, an oral explanation of the exercise is also played for the student when an exercise is started.
You can listen to the explanation yourself by pressing the play button to the right below the exercise gallery.
Press the button again to stop the playback.
The explanation is played in the selected language for the instructor unit, but can be played in other languages in the vehicles if other languages are available.
Selection of vehicle language
If you have students who speak another language you have the option to change the language used in the vehicles.
Press the button with the flags at the bottom of the screen below the exercise gallery.
Now you can select the vehicles you want to change the language for. Press the green checkmark to change the language for the selected vehicles.
The language is reset when you reset your set of vehicles during or after your teaching session ends.
Start an exercise
When you have scrolled to the first exercise you wish to teach, press the ‘Start exercise’ button at the bottom to the left.
The exercise is started correctly when you can see the name of the exercise in the blue bar at the top of the screen.
How are exercises displayed?
The initiated exercise is shown to the students in the places where the students are in a waiting position before an exercise area.
The exercise display shuts down as soon as the student starts to drive and is repeated every time they stop in a waiting area.
If you are in doubt about where the exercises are displayed, you can look at the big screen solution (If it is available) where a visual indication on the map can be found in the form of yellow dotted lines indicating the areas if this functionality is enabled.
Switch to a new exercise
When your students have completed the current exercise and you want to start the next exercise, scroll to the next exercise with the arrows and press the ‘Start exersice’ button again to switch to the new exercise.
Repeat the process until your students have completed all of the exercises you wish to teach them.
Stop or pause the exercise
If you wish to pause or stop the exercise you can press the ‘Stop/Pause’ button at the bottom to the right.
The pause button is useful if you want to stop showing the current exercise for the students, but still want to receive data that are adapted to the exercise.
You can check if the exercise has stopped or paused by seeing if the blue exercise bar has a pause icon displayed or has dissapeared again from the top of the screen.
Thank you for reading our introduction to the Tivilo system. If you wish to learn more in detail about Tivilo, you can read about our latest version 5.0 by clicking on the ‘Tivilo 5.0’ button at the top of the screen or press the ‘History’ button to learn more about what was introduced in previous versions of Tivilo.
Enjoy using Tivilo!